Buff 2011 | Share Everything Here

Rrraanndddooommmm


Little facts that both you and i have just make me.. happy. Yeah, happy. 
the facts that i like to do things that you do, those times when we had same thoughts, those times when you picked same choices as me, or those times that i accidentally had with you, i just felt relieved for those things even if you were far-far away. 

But i just realized that we're actually.. indeed live in different worlds. 
That world you live in.. is totally different than mine. 
You're staying late playing notes, and i'm staying late in school's library.
You're hanging with your friends and i'm.. let's just say, hanging out with physics problems..?
Something that you're usual to could be something that i'm not familiar to..

All those walls that i've built for years, all those limits that i've set a long time ago, 
you're the reason i break them one by one.. i think i've been trying hard to live in the same world as you.
I just.. can't stop. I've been through a lot of things, you know. I've been to far, there's no way to stop.


Problem installing TPW

Hi, just want to share something in short.
Recently i've just installed a program in my computer.. well, after a few errors and fails.
It's called TPW, Turbo-Pascal for Windows , if i'm not mistaken.
I used it for my computer subject at school to learn programming or whatever i don't know how to call it..
So TPW is just like a lite version of Pascal.

Anyways... i've met a few errors and 'not-responding's during the installation.
When it almost finished it seems like the program stopped working i couldn't close it,
and the only way was restarting my computer..
So the next meeting i asked for my teacher's help and he simply suggested me to
close all windows, and then install it. And magically, it worked.
Finally.. i've installed TPW in my computer.

So the point is :
When you find some errors while installing TPW, just close all of the windows and tasks
before you install it.

Okay then, that's all.. Hope this help.
:]


Category: 0 comments

Trick : Submitting your assignment after the deadline

having a dead-end on ideas when you're doing or typing
your assignment and the deadline is coming soon?
here is just a trick, to 'postpone' your deadline.
Unfortunately.. Works for soft-copied-assignment only,
and when you're submitting through e-mail . 

1st ... Make a fake document file that you want to submit .
you can type a word or whatever, just make a fake file quickly.
you can make .doc , .ppt , or even .pdf ... it's up to you .

2nd ... Open Notepad, then drag the fake file onto the notepad.
you'll see some symbols and characters. erase some of them..
then save the file and close the notepad. your fake file is ready.

3rd .. Send your fake assignment . this fake file is unable to be opened,
there will be an error or something. Maybe your teacher will realize
this after a few days.. or he / she will reply your e-mail asking for
the assignment. you can tell your teacher you rarely check you e-mail inbox.. 

4th ... Then when you're finish with your real assignment, you can send
or submit the real one to your teacher.

so that's all . i've never use this trick though..
rather than using this for assignment maybe
i'll just this to play a trick to my friend or something like that..
just USE THIS TRICK WISELY

okay then. see you on the next post.. 


credit :  damnlol.com

Social networking....

unimportant post ALERT
or


so here's how it happens... social networking helps you to connect other people. 
i used to be thankful cause this site helps me to know more about the guy i adore and like so much.
he was out of my reach but then i was able to speak with this guy in real life real world.
i was overjoyed and i felt like i was flying.
the other day  i saw a post, it overturned my mind, suddenly i felt down and feeling like i didn't have any hopes.
he wrote he couldn't forget a smile, and i know that smile wasn't mine, it was somebody else's . 

i SMILED then i CRIED 

i know he won't read this. just spilling the contents of my heart  

teehee
Category: 0 comments

After School's Nana Photo Spam

Hi.. i just want to upload some photos of After School's Nana . She's one of my favorite member in After School. oh, btw After School is a K-Pop Girls group just for your information.

oh, and i don't own the credits of these photos.
visit afterschooldaze.tumblr.com for more photos of Nana and other After School members.

Fyi Nana is a certified make-up artist, and she used to be a model too . ^^


Soo that's all. Hope you enjoy them just like me. :D

see you on the next post .
Category: 0 comments

Icon converter

Finally...! after google-ing for almost 30 minutes, and searching for working download link...
i can convert jpeg images to .ico files. Actually there are lot of online and offline program to convert them,
but the thing is... i can't convert them into 256 x 256 size. the common maximum size is 128 x 128.
finally i've found the right program just like what i want.. and it is Image 2 Icon Converter 3 .
After i've found it, un-luckily i just can't find any working download link.
but i guess spending some time searching for the right link was a success.
Here is the working link : here

Just want to share....
oh and there is another program, it's very simple. you just need to drag and drag..
but the maximum size is 128 x 128 only.
the program is Aveiconfier, click here to download it.

Quite a short post... so see you in the next post

Roses in the garden - Photo Retouching

finally~ i'm able to write again. It's such a long time since the last time i updated my blog. I was busy with my exams.. and i'm now officially a senior high school student. So here i am,
to post.. something, that isn't important, actually.. :l
My mom grows quite a lot roses in our garden, and when they blossom, they look beautiful. Well but fyi our garden isn't some kind of english garden or another luxurious and awesome garden, flowers can't grow so easily here, in Indonesia.. but still, i like how the roses are blooming, they're pink, red, and white, quite a nice color combination. i took some pictures with my phone.
SO , here are the photos. 


 i edited the first photo, but it didn't turn out well i guess. the blurring stuff is failed~
i use clone-tool on photoshop to remove some brown-colored and faded part of the pink rose.


yeah and that's all. thanks for reading this useless post.


Simple Colouring with Photoshop - Mewarnai cepet cepetan pakai Photoshop

Halo.. post ini dibuat ndadak buat Bunga Fatimah yang minta tolong lewat twitter buat njelasin tentang mewarnai di Photoshop. *yang bener aja woy njelasin lewat twitter yang cuma mbolehin nge-post 140 karakter per post.
Untung bunga punya ide yang cemerlang luar biasa, lewat blog. *malah nggak kepikiran, makasih Bung.
Ya udah ini dia. My hurricane Post..!

Ada beberapa tool penting untuk mewarnai sederhana ( maksudnya nggak master master banget gitu yang aku juga nggak dong ) di Photoshop.
Beberapa diantaranya yaitu Gradient tool, Magic Wand Tool, Burn dan Dodge tool, Lasso tool, Paint Bucket tool, dan Brush tool.
Lasso tool, Magnetic Lasso Tool, dan Magic Wand digunakan untuk membuat seleksi.
Paint bucket tool dan Gradient tool untuk mewarnai.
Selain mewarnai, gradient tool juga digunakan untuk memberi gradasi. Selain gradient tool bisa juga digunakan Brush yang diotak - atik opacity/flow-nya , dan Burn dan Dodge tool.

Nah untuk pertama, buka gambar yang akan diwarnai. Di sini aku cuma nggambar cepet aja pake brush.


Nah kalau udah dibuka, yang perlu kita lakukan adalah menyeleksi. Buat apa? Biasanya seleksi dipakai untuk 'menyendirikan' bagian yang akan diwarnai. Kalau bagian tsb udah diseleksi, nanti lebih gampang untuk diwarnai, digradasi, dsb karena macem macem perlakuan itu nggak akan 'terjadi' atau mempengaruhi bagian di luar seleksi.

Ada tiga alat yang biasanya aku pakai untuk membuat seleksi.
Yaitu :
Magic Wand --> tool ini praktis banget. Tinggal klik, dia bakal otomatis nyeleksi bagian itu.
Misalnya kalau di gambar atas aku nge-klik bagian putihnya, dia bakal milih semua bagian putih dalam garis hitam. Kalau aku nge-klik garis hitam, dia bakal milih garis hitam dan nggak milih bagian putih lainnya.
Tapi ada repotnya juga kalau gambar yang kamu seleksi itu hasil scan, yang biasanya 'kurang bersih' .
Si magic wand mungkin nggak bakal milih semua bagian yang kamu anggap putih karena sebenarnya dia udah mbaca garis abu abu ( yang nggak kelihatan sama kita ) karena dia terlalu teliti.
Ketelitian Magic Wand bisa diatur lewat box Tolerance yang ada di bagian atas photoshop. Semakin banyak toleransi, berarti si Magic Wand bakal lebih nggak teliti, dan demikian sebaliknya. Untuk itu sebenarnya tergantung kita juga. Ada baiknya kalau kita coba coba sendiri, dan menentukan setting-an yang pas untuk kita sendiri.


Magnetic Lasso tool --> Nah yang ini agak lebih manual, dia bakal milih agak ndeket ndeket sama garis terdekat. Namanya juga magnet. Seolah olah seleksinya nanti maunya nempel sama garis item yang paling deket. Masalah lebih enak pakai ini atau Magic Wand sih tergantung keadaan dan kebiasaan kita sendiri. Lebih cepet pakai magic wand biasanya.
Oh ya sama aku lupa bilang dari tadi, seleksi bakal ditandai sama garis putus - putus . Nanti muncul kok.

Lasso tool --> Yang ini lebih bebas dan lebih manual lagi daripada Magnetic Lasso Tool. Kamu bener bener nentuin jalan seleksi-mu sendiri. Nggak bisa njelasin lagi, lebih lengkap dan jelasnya silahkan coba sendiri.

Oke itu tentang seleksi. Ini gambar tadi yang udah di seleksi pakai Magic Wand
ada garis putus putus nya, kan?


Terus lanjut ke mewarnai.
Tool paling dasar untuk mewarnai adalah Paint Bucket tool.
Kalau mau memberi gradasi pada objek, ada dua cara yang biasa tak pakai. Yaitu dengan gradient tool yang otomatis, atau pakai brush atau burn-dodge tool yang manual.
Kalau mau bener bener cepet, ya pakai Gradient tool . Tapi kalau objek yg diwarnai agak bukan bangun dasar, biasany gradasinya bakal kelihatan aneh, soalnya bayangannya di mana, atau bagian gelap/terang yang mana kan tergantung bentuknya juga.
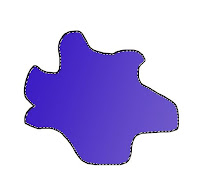
ini contoh yang pakai gradient tool

Nah ada bagusnya juga kalau kita ngasih gradasinya manual.
Bisa pakai Brush yang dikurangin opacity dan flow-nya.
Atau pakai Burn dan Dodge tool.

Cara pertama yaitu pakai Brush. Nggak mungkin kan kita nyari warna gradasinya satu persatu kayak ngewarnai pakai pastel. Setelah nge-paint-bucket objek dengan warna dasar, yang perlu kita lakuin cuma pilih warna hitam ( atau warna yang paling nggak lebih gelap dari wana dasar. ) untuk ngasih bayangan atau gradasi gelap pada objek.
Inget, sebelum nge-brush objek, kita harus menurunkan opacity dan flow brush-nya dulu. Opacity dan flow dipakai untuk nentuin transparency brush. Tujuannya biar gradasi warnanya nggak 'njegleg' dan halus.
Setelah di-brush, kita bisa nge-brush lagi di atasnya kalau kurang gelap. Cara yang sama juga bisa dipakai untuk warna putih, untuk gradasi yang terang.
Kalau warnanya gelapnya masih jauh dari warna dasar atau kurang halus gradasinya, opacity dan flow bisa dikurangi lagi. Tapi waktu yang dibutuhkan bakal lebih lama untuk mencapai gelap tertentu.
Selama kita belum nyopot klik-an mouse kita, bagian yang di-brush nggak bakal ndobel kok.
Maksudnya di sini, kalau masih di-klik mousenya, brush akan mewarnai di opacity yang sama. Kalau udah kita copot klik-nya baru di brush lagi, barulah brush akan mewarnai lebih tebel.
Susah njelasinnya, yang penting coba coba aja sendiri dan rasakan nanti bedanya kalau pakai Burn dan Dodge tool.
Untuk sementara, ini hasil gradasi pakai brush.


Lanjut ke Burn dan Dodge tool. ( untuk ganti burn-dodge tool, klik kanan terus pilih )
Pada dasarnya dua alat ini hampir sama kayak brush hitam-putih yang dikurangin opacity-nya.
Burn kayak brush hitam, dan dodge kayak brush putih.
Exposure yang ada di bagian atas photoshop juga fungsinya hampir sama kayak opacity dan flow pada brush. Biar gradasinya halus, kurangin exposure-nya sehingga nggak terlalu 'njegleg' perbedaan gelap-terang warnanya.
Bedanya Burn-dodge tool sama brush yaitu :
Burn-dodge tool nggak bakal meduliin kamu udah nyopot atau masih nge-klik mouse.
Kalau burn toolnya lewat berkali kali di bagian yang sama walau mouse masih di-klik, ya jadinya bagian tsb bisa jado terlalu hitam, gosong, gelap, atau yang lainnya. Jadi kalau belum biasa, gradasinya bisa kacau dan nggak rata. Susah juga njelasinnya nih, pokoknya coba sendiri, nanti juga pasti lama kelamaan kerasa bedanya sama brush.
Ini hasil gradasi yang pakai burn-dodge tool :
Saranku aja, kalau masih belum biasa pakai burn/dodge, kurangin dulu exposure-nya. antara 5 - 8% udah cukup. Jadi nggak terlalu kaget nanti.

Masalah mau pakai gradient tool, brush, atau burn-dodge, semua terserah. Tergantung kita sendiri lebih enak yang mana.
Yang penting selalu coba coba. Nanti juga kerasa sendiri bedanya, atau mana yang lebih enak.


Oke deh. Cuma ini yang bisa aku tulis.
Susah juga kalau njelasin cuma lewat tulisan... AARRRGGGH aku juga bingung nih mau njelasinnya gimana~~~~
 Semoga aja postingan ini bisa membantu walau sedikit.
Gimana, Bung..? Sori cuma lewat tulisan, nggak bisa njelasin langsung.. T^T
Semoga bergunaa~

another geje post~ (051811)

i like to read your blog, your words are just awesome.
two messages mean A LOT to me, cause you write it first.
i like your bright smile, which makes my heart flutters.
i wait in the night, waiting for your latest tweets.
and wait in the morning, waiting for your status updates.
i like re-reading your messages in my phone,
looking at the sender's name, it's your name.
i like seeing your music plays.
i like seeing your face while you're singing, cause it's cute.
The way you never let people down, the way you think,
the way you learn, the way you laugh, they impress me.

Beads, Charms, Chains = Accessories..! ( editing photos )

Today's activity : taking some pictures of my stuff.
kekeke. Some of them are these accessories materials. I used to make accessories in my spare times.
I rarely use them though. I sold them to my friends. :P
It was totally fun, i really enjoyed making accessories.
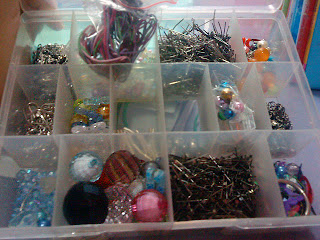
Anyways, i've just took a look on my materials boxes, my favorite stuff.
There are beads, chains, charms, beautiful stones, and some others like that.
I ended up taking some pictures of them with my phone camera, and then edited them.
Here they are, take a look~


Chains   

Colorful~

Charms :]

another charms


Colorful beads~

1st box ( for beads )

2nd box ( for chains, charms, hooks, nails, etc )
my very old handmade phone-strap :p


Cute isn't it? I like them very much. I have a lot of stuff like that in my bedroom, kekeke. Ribbons, Colorful threads, Glitters, laces, and others.
Anyways.. how about these edited photos? what do you think..?
tell me if you have something to tell. :]