Buff Computer | Share Everything Here
Showing posts with label Computer. Show all posts

Yeah

For those who don't know. i'm now doing commission works,
so i'm accepting orders for some designing works
and little projects. 
I'm doing :
- Online store DP
- Packaging
- flat illustrations
- photo editing 
- infographic  ( images and videos )
- sticker design
- poster design
- other projects upon request

I'm using Photoshop and Illustrator for images; After Effects and Ulead for videos.
Contact through facebook message or e-mail.


Some of the works :


Another Kpop Biases Fanvids

Actually i've uploaded this video quite a long time ago.
These 2 videos are another fanmade video of my Kpop biases...

It's BAP's Daehyun and After School's Nana..
Just want to share..
edited with Ulead


Comments, critics, opinions are welcomed :D
thank you..

Copy paste

There are times when you need to copy and paste some words from the web to your Microsoft Words or Power Points and then some annoying things like highlighted-characters and jumbled-fonts happen.
Like this ?


Well usually i'll copy the words, paste them on notepad, then copy again,
and paste them on words or power points.
I often use this trick ( i don't know whether this is a trick or some kind of cheat, whatever ).
It's easy, and quite effective. 


You can't include the pictures anyway.

So that's all. i just want to share. i've been using this method since like 2 or 3 years ago.
Bye 


Getting used with Illustrator

wohoo, finally i've installed Adobe Illustrator in my laptop, and
still learning to use it.
Still i can't explain clearly the difference between photoshop and illustrator..
photoshop is mostly for photo-editing and photo-manipulation.. while illustrator is for vector images
and illustrations.. i would say that illustrator more or less.. works like corel.
you use illustrator for making logos, vectors, animations, and others..
combining both programs will creates amazing graphic-arts.

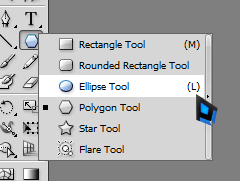
so on the first try.. i found that i couldn't right-clicked the tools to view another option of the tools..
in case you don't know what i'm talking about.. i've captured a picture.. this option should be shown when you right click the tool, but when i did, it didn't happen..
so after searching on Google, i tried one of the advice,
you should right-click and hold down the mouse buttons...
and it worked..! whoa, for a moment i thought that i should download another 1,8 GB file... thank God i shouldn't. keke


i tried to make a graphic from a tutorial.. it was so cute, and random. i like it.

this is the tutorial link :
http://blog.spoongraphics.co.uk/tutorials/how-to-create-an-abstract-vector-design-in-illustrator


and this is my result :

it doesn't look as good as the original~
it's darker too. :(
but never mind, it's my first try.
i think i'll make another, based on my own idea next time.
for this week i've had not enough sleep.. trying new things
on photoshop and illustrator..


so that's all.

oh and one more. i think i'll share another experiments of mine.. keke
i've never tried this before, but i often see this kind of photo-editing on the web..
they're everywhere.. people as the center with random images, vectors, lights and others as the background.
i used my friend's photo here, keke..
i think the photo fits with the concept.
so that's all.. now this is really the end.
thank you if you read this post till the end.

Oh and don't forget to write your thoughts, opinion, critics, or anything except advertisements on the comments section.
i'd be glad if you want to.
thank you...  God bless. 


My first FMV~

Aahh finally i've made my first fanvid ( fan-video / FMV )..!
It's BAP's Daehyun..!
After months i've been thinking to make one~
I spent a day to made it, and i think, totally worth it.
I'm so into BAP these days, i think i'm going to be a Baby soon..
of course Daehyun will be my bias. ( and again, a main/lead vocalist. )
maybe i'll make a fanvid about After School's Nana next time. keke

Soo this is the video..  ( you can watch it on Youtube too )


Opinions, comments are welcomed :]

SNSD Google Chrome Themes

hello~ it's been a long time since the last time i post something about computer or downloads.
so here it is. It's SNSD ( Girls' Generation ) Google Chrome themes.! 
lately i've been browsing chrome themes and i found some of these themes.
since i'm an SNSD fan, i'd like to share these. 
for you other Sones, hope you enjoy this. keke 


( click on the 'download theme' if you're interested! )
btw, i don't own any of this. just sharing :]
thank for reading this post, God bless you. 

Trick : Submitting your assignment after the deadline

having a dead-end on ideas when you're doing or typing
your assignment and the deadline is coming soon?
here is just a trick, to 'postpone' your deadline.
Unfortunately.. Works for soft-copied-assignment only,
and when you're submitting through e-mail . 

1st ... Make a fake document file that you want to submit .
you can type a word or whatever, just make a fake file quickly.
you can make .doc , .ppt , or even .pdf ... it's up to you .

2nd ... Open Notepad, then drag the fake file onto the notepad.
you'll see some symbols and characters. erase some of them..
then save the file and close the notepad. your fake file is ready.

3rd .. Send your fake assignment . this fake file is unable to be opened,
there will be an error or something. Maybe your teacher will realize
this after a few days.. or he / she will reply your e-mail asking for
the assignment. you can tell your teacher you rarely check you e-mail inbox.. 

4th ... Then when you're finish with your real assignment, you can send
or submit the real one to your teacher.

so that's all . i've never use this trick though..
rather than using this for assignment maybe
i'll just this to play a trick to my friend or something like that..
just USE THIS TRICK WISELY

okay then. see you on the next post.. 


credit :  damnlol.com

Icon converter

Finally...! after google-ing for almost 30 minutes, and searching for working download link...
i can convert jpeg images to .ico files. Actually there are lot of online and offline program to convert them,
but the thing is... i can't convert them into 256 x 256 size. the common maximum size is 128 x 128.
finally i've found the right program just like what i want.. and it is Image 2 Icon Converter 3 .
After i've found it, un-luckily i just can't find any working download link.
but i guess spending some time searching for the right link was a success.
Here is the working link : here

Just want to share....
oh and there is another program, it's very simple. you just need to drag and drag..
but the maximum size is 128 x 128 only.
the program is Aveiconfier, click here to download it.

Quite a short post... so see you in the next post

Make your own Blinkies

Hi, in this post i would like to write about making your own Blinkies 
So what is Blinkie anyway? You can find blinkies on some blogs.
Usually blinkies are gif pictures that are put on blogs as some kind of accessories ( or widgets )
You can put them on your second or third column of your blog.
You can find some example of blinkies on these site :
All you need to do is just copy the HTML codes, and paste them on your blog.
( it's like adding widgets to your blog )

So let's move on.. 
recently i've tried to make my own blinkies using photoshop, gif-maker, and a file-sharing site.
and in this post i'll tell you how to make it..! *drumroll
So here are the steps :


1. Make the base..! ( or template, or background, or whatever you call it. )
In this step, you should make some kind of base image or background image for the blinkies.
In blinkies, there are some words changing, but the background stay still. So, you have to crate that image. It's all up to you, make it with your imagination and be creative~
and don't forget to add a space for the words. 
Here are three examples for the background image :


You can use Adobe Photoshop, Corel Draw, Paint, or another
programs to make these background images. 
And now.. let's move on to the next step. :]


2. Make the images with words
And next, you'll have to make the images with words that you've decided. 
For example : "Hello! Welcome to this blog" or whatever.
Cut the sentences into 3 - 4 fragments like Hello! - Welcome - to - this blog.
Make some images with same background and different words according to the sentence fragments.
Save the image that you've added with words with different title, so the background image won't be replaced, and you can use it again for another sentences.
These are the example of images from 2nd step.


 3. Combine them into a gif file
Next step is combining the images into one gif file. You can use any programs to make it.
If you think you don't have any, you can make it through a site like picasion.com . 


4. Upload the gif file into a file-sharing site.
Why don't we upload it directly to the blogger? Well i'm not so sure, but i've tried to, and it was failed.
When i tried to add the picture gadget and upload the gif file, it didn't move, which is mean the gif file was treated as jpg file ( non-animated ) . But when i tried to add the URL instead of uploading the gif from my computer, it worked.
You can upload the animated image to any file-sharing sites. For example i usually use www.4shared.com or photobucket.com .


5. Add to your Blog.
And now the last step. All you need to do is adding the uploaded gif into your blog using widget feature.
( dashboard - design - add gadget ) .
You can choose whether you want to use -picture- or -HTML- widget.
If you choose -picture- then you'll just need to copy the image's URL and paste it.
If you choose -HTML- you have to copy the HTML code ( not the URL ) of your image to the box.
Using -HTML- widget you'll be able to change the size or position of the image. 


And that's all..! Your own widget is done. 
Hope this help. 

about Internet Download Manager

hello. this i'd like to write about Internet Download Manager, a shareware download manager which ables you to accelerate your download speed and get some superb features in downloading stuff.
IDM or Internet Download Manager in my personal opinion, is very important for you, download maniacs.

I've tried some download manager programs, and i found that IDM is the best, still ( in my opinion ) .
I've tried IDA ( Internet Download Accelerator ) , but it wasn't successful in accelerating, i think..
and also DAP ( Download Accelerator Plus ), but the downloading speed was the same without DAP.
downloaded videos with DAP weren't completed almost all the time. So the videos were broken.
then Orbit Downloader but then it failed me to open some pages, i had to press "Alt" and click the "reload" button at the same time to open the page properly.. argh.
Finally i tried IDM.. and it works.!
i'm using IDM now.

Waaa.. IDM is the best. When i got IDM, i started to be a download maniac. I download many files everytime.
and of course, using IDM..!

anyways.. let's talk (or write ? ) about IDM's features..

first...
IDM ables you to download files faster.. and this is the main feature of download manager programs.
you can download files 2x faster..
but yea, using IDM will make your browsing speed decreases drastically..
my computer teacher once said this : "IDM is a bandwith sucker"
maybe that's right..? usually i use IDM to download files, then left them and play games, while waiting for the files to be downloaded.

second..
with IDM you can resume your downloads..
and it works almost all the time..
well, for downloading mp3's from 4shared, it doesn't work i guess..
but mp3's are quite small after all.. so you don't have to resume or pause it, right?
for some big files like videos or films.. it works..

third..
download files automatically..
i like to download videos..
using IDM everything is simple.
when you open an video on youtube and play it.. automatically there will be a pop up thing ( ah whatever you call it ) from IDM on the bottom left corner on the page
"Download video from this page" . Just click it, and the video download will be started.
This works on facebook videos too.. click play, and there will be a pop up from IDM.
If you use chrome or another browser other than Mozilla , you have to change the settings first.
Open your IDM then click Downloads - Options - Capture downloads from the following browser
Tick your browser, and click OK.

IDM works with Internet ExplorerOperaNetscape NavigatorApple SafariFlockGoogle ChromeMozilla, and Mozilla Firefox.


then, that's all. took some informations from wikipedia . 
hope this helps. 

Computer Task 3rd Part - Fasilitas Blog ( Widget and Gadget )

Halo kembali menulis tugas TIK yang ke tiga.
Kali ini saya akan menulis tentang..
fasilitas - fasilitas blog yang akan difokuskan pada widget ( atau gadget? ) blog. 
Sekedar mengingatkan data saya,


Nama : Debora Graceilla Riadi
Kelas : IX - 10
No. absen : 13

Fasilitas pada Blog ( widget dan gadget )

oke.. mari membahas mengenai fasilitas - fasilitas blog.
Blog itu menyenangkan dan bebas .


di blog kita bisa menge-post tentang apaa saja. Bisa musik, video, gambar, tulisan, dsb.
Kita bisa mem-publish berbagai macam hal di blog. Blog memilki banyak fasilitas yang memperbolehkan kita memasukkan berbagai media ke dalam blog kita.
Di blogger misalnya.. kita juga punya yang namanya Dashboard .
Di dashboard kita bisa memantau views state blog kita, komen - komen, mengatur blog, dsb..


Dan juga yang akan kita bahas sekarang yaitu : Widget dan Gadget .
Widget dan gadget ini sangat penting untuk menaikkan kualitas blog kita.
Dengan adanya widget dan gadget, blog kita akan terasa lebih berwarna,
dan nggak terlalu datar atau simpel..
Sayangnya memang semakin banyak widget, blog kita akan semakin lama loading-nya..
Tapi yah apa boleh buat..
Ada banyak contoh widget, misalnya : chatbox, jam dinding, quotes, tags, posts list, dsb..


jadi apa bedanya widget dan gadget..?
belum tau juga sih.. masih baru dalam dunia blog-blog-an..
ini salah satu potongan artikel yang saya temukan lewat google :


The easiest way to explain it is that a gadget is any widget that is not a widget. Sound confusing? A widget is a piece of reusable code that you can plug into virtually any website. A gadget acts just like a widget, often fulfilling the same purpose, but it is proprietary. It only works on a certain website or a specific set of websites. 

For example, Google Gadgets can look and act like widgets. But they only work on Google pages. 
A widget, on the other hand, works on any page that lets you add an HTML block. You can put them on your blog, or your personalized start page, or your personal website.


lebih jauh lagi tentang widget bisa klik di sini
Jadi gadget bisa dibilang lebih terbatas daripada widget. Gadget mungkin hanya bisa digunakan di dalam web atau situs tertentu. Sedangkan widget, bisa digunakan di segala macam situs dan web yang ada HTML ( Java script? ) nya. Dan kayaknya udah banyak website yang ada HTML-nya.. 
jadi bisa dibilang HTML lebih 'general' alias luas.. bisa dipakai hampir di mana aja.


Sekarang langsung aja kita liat caranya nge-add widget ke blog kita..
caranya dari dashboard kita klik design tepatnya ke page elements
page-nya seperti ini..
klik untuk memperbesar


Ada beberapa widget yang sudah disediakan dari blogger.. antara lain seperti di gambar bawah ini..
caranya ke page ini tinggal klik add a gadget


Oke deh.. dari sini tinggal pilih widget yang kita inginkan..
untuk widget yang lebih luas lagi kita bisa cari dari google..
nah terus tinggal pilih widget yang kita inginkan, copy HTML yang ada..
kemudian buka page di atas dan pilih HTML / Javascript
dan kopi HTML tadi ke situ.. klik save dan taaraaa udah jadi deh..

Jadi itu aja tentang widget dan gadget.. sekian.
happy blogging~ 

Computer Task 2nd Part - Membuat Blog

Halo.. Kembali lagi dalam post ini.. tentang tugas TIK..!
Kali ini saya akan menulis tentang tugas nomer dua yaitu :

Apa saja yang perlu dipersiapkan pada saat akan membuat blog? 
Jelaskan secara rinci urutan langkah-langkah membuat blog!
Langsung aja..
Dalam tugas ini, saya akan menulis tentang cara membuat blog di situs blogger.com
Ada tiga penting yang perlu kita siapkan sebelum membuat blog kita sendiri,
yaitu : 
1. Laptop / Komputer / Notebook ( hal pertama yang harus kita miliki atau tersedia sebelum memulai semuanya..! )
2. Koneksi internet ( bisa dari modem, sambungan telepon di rumah, di wanet, sampai WiFi atau Hotspot gratisan )
3. Keberanian dan kemauan untuk coba coba ( hehhe.. )


Jadi di bawah ini adalah langkah langkah membuat blog kita sendiri di situs blogger.com 
1. Hal pertama yang perlu dilakukan adalah : siapkan laptop dan koneksi internetmu,
setelah itu buka situs blogger. Bisa pilih : blogger.com atau blogspot.com
Setelah itu akan muncul halaman home blogger. Seperti di bawah ini


Selanjutnya tinggal klik button Get Started , untuk memulai tentunya..
2. Setelah meng-klik tombol tadi, maka akan muncul halaman selanjutnya..
Semacam formulir seperti di bawah ini..


Isi formulirnya.. jangan lupa isi word verification dan centang persetujuannya..
kemudian klik button Lanjutkan..!


3. Setelah itu akan muncul halaman selanjutnya..


Ayo tentukan judul blog-mu.. setelah itu tentukan juga alamatnya..
alamat blog-mu mau tidak mau harus pakai @blogspot.. 
kalau ingin menghilangkan @blogspot-nya harus beli domain.. :( alias bayar.
Nah, setelah selesai klik button lanjutkan ( atau continue )


Nah setelah itu hal terakhir yang harus kita lakukan adalah memilih template.. 
untuk sementara tinggal pilih template yang ada.. baru setelah itu bisa kita atur nanti design template-nya..
habis itu klik Continue ( atau lanjutkan ) 
Maka akan muncul halaman berikutnya..


tinggal klik Start Blogging ( atau apalah terserah )
dan muncul dashboard kita.. dari dashboard kita bisa nge-post, mengecek views state blog kita,
mengecek komen, mengatur blog ( setting ) , dsb..


selesai sudah. Happy blogging..! 


Trying editing photos

Hello. I bought a pair of shoes yesterday, and i took some photos of them.
Then i tried to edit them. I've never tried this before,
i just wanted to make it like kind of photography editing (?)
So these are the edited-photos


ah.. still need to learn much more..
i just set the contrast and added some blur to the background..
i use Adobe Photoshop to edit these photos..


oh.. and this is my old-edited-photo of mine.. i'm trying to 'erase' the glasses..
and blur the background, but it's fail, in my opinion.. ARGH!